

If you’ve ever looked at a landscape lighting setup and wondered how those delicate bulbs stay powered safely in wet outdoor conditions, the answer lies in a landscape lighting transformer. This unassuming box is the unsung hero of any low voltage outdoor lighting system, it steps down your home’s standard 120-volt household current to a safer 12 volts that powers landscape lights, path lights, and accent fixtures. Whether you’re upgrading a tired deck or wiring up an entire backyard, understanding how a landscape lighting transformer works and choosing the right one will save you money, frustration, and potential safety headaches. Let’s walk through what you need to know to get your outdoor space properly lit.
Table of Contents
ToggleKey Takeaways
- A landscape lighting transformer safely converts your home’s 120-volt household current to 12 volts, eliminating shock hazards and enabling secure outdoor lighting installation with minimal digging.
- Properly size your landscape lighting transformer at 125% of your anticipated fixture load—typically 100W for under 80 watts, 150W for 80–150 watts—to prevent voltage sag and dimming issues.
- Cable length and wire gauge significantly impact voltage drop, so measure the distance from transformer to your farthest light and keep standard runs under 100 feet for optimal brightness.
- Always plug your transformer into a GFCI-protected outlet, bury low voltage cable 6 inches deep in a trench, and use weatherproof junction boxes for connections to prevent corrosion and electrical failure.
- Common issues like dimming lights, flickering, or inconsistent brightness stem from voltage drop, overloading, or poor connections—troubleshoot by checking GFCI outlets, verifying transformer power, and inspecting buried wires for damage.
- Upgrade to LED landscape fixtures only if your transformer is LED-compatible, as many older models hum or buzz with low-current LED loads and won’t run efficiently.
What Is a Landscape Lighting Transformer?
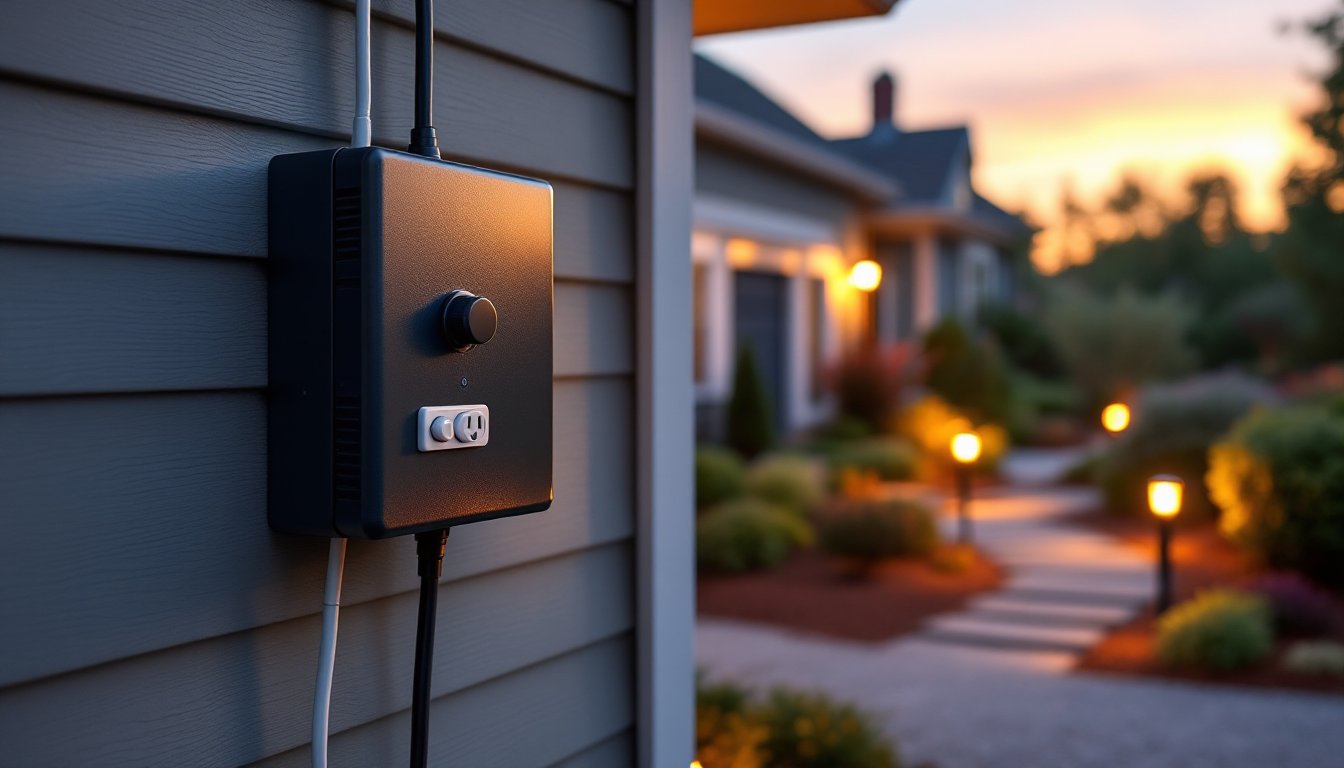
A landscape lighting transformer is an electrical device that converts standard household voltage (120V AC) down to low voltage (12V AC), making it safe for outdoor lighting fixtures buried in soil, submerged near water features, or mounted on wet surfaces. Unlike hardwired fixtures that require conduit, junction boxes, and professional installation, a low voltage outdoor lighting transformer allows you to run thin, flexible wire across your yard with minimal digging and no permit in most jurisdictions.
Think of it as a step-down converter: household current enters one end at full strength, and safe, low-voltage power exits the other end to feed your lighting circuit. Because low voltage systems operate at 12 volts instead of 120, they pose minimal shock hazard, a major reason they’re the standard for residential landscape work. Most modern systems use a transformer for low voltage outdoor lighting that plugs into a standard outdoor GFCI (ground fault circuit interrupter) outlet, making installation straightforward for any homeowner with basic electrical comfort.
Key Components and How They Work
A landscape lighting transformer contains several critical parts working in concert. The primary coil (wound on the input side) receives your household voltage. The core, usually an iron laminate, transfers magnetic energy, and the secondary coil steps down the voltage. A protective fuse or circuit breaker prevents overload, and a weatherproof enclosure protects everything from rain and moisture.
Many modern transformers now include built-in outdoor lighting control features: a timer, photocell (light sensor), or smart control compatibility so you can automate when your lights turn on and off. Some models also offer dimming capabilities, letting you adjust brightness via a landscape lighting controller without adding extra wiring. The transformer acts as the brain of your system, all power flows through it, and it’s the point where you’ll troubleshoot most problems.
Voltage and Wattage Specifications
Low voltage transformer for outdoor lighting typically comes in three common wattages: 60W, 100W, and 150W, though larger residential systems may use 300W or 600W models. The wattage rating tells you the maximum load, the total wattage of all lights you can safely run at once. If you exceed the transformer’s rated wattage, voltage will drop across the circuit, and distant lights will dim or flicker.
Always check your fixture wattages and add them up. A typical landscape LED light runs 0.5 to 2 watts, while older halogen or incandescent landscape lights draw 5 to 20 watts each. If you’re running fifteen 4-watt fixtures, that’s 60 watts total, right at a basic transformer’s limit. Most installers recommend sizing a low voltage landscape lighting transformer at 125% of your anticipated load to leave headroom for future expansion and prevent voltage sag. A 100W transformer, for instance, works best with a real load of around 80 watts or less.
Choosing the Right Transformer for Your Outdoor Space
Picking the right landscape lighting transformer comes down to three factors: the total wattage of your fixtures, the total length of your low voltage landscape lighting transformer cable run, and whether you want integrated controls.
Start by sketching your yard and noting where lights go. List every fixture and its wattage, check the label or product spec sheet. Add them up. If you’re under 80 watts total, a 100W transformer is appropriate. Between 80 and 150 watts, go 150W. Above 150 watts, you’ll either need a larger transformer or split your design into two separate circuits, each with its own transformer. Many homeowners underestimate their load and end up with constant dimming issues at the end of long runs.
Sizing and Load Calculation
Cable length matters because voltage drops as current travels down thin wire. The longer your run from transformer to the farthest fixture, the more the voltage sags. For a 100-foot cable run at full load, you might lose 2–3 volts, leaving only 9–10 volts at the far end, barely enough to light standard incandescent landscape lights properly. LED fixtures are more forgiving because they draw less current, but it’s still a real concern.
Use this practical approach: measure the wire distance from where your transformer will sit to your farthest light. If that distance is over 100 feet, move the transformer closer, run two separate circuits, or consider a transformer for low voltage outdoor lighting with integrated voltage boosting. Cable gauge also affects voltage drop, 14-gauge wire loses voltage faster than 10-gauge. Standard landscape wire is 12-gauge, which works well for most residential runs under 100 feet. For complex designs or large yards, consider layout sketches that group nearby lights into a single circuit rather than one long daisy-chain run.
Installation and Safety Best Practices
Installation of a landscape lighting transformer is straightforward, but skipping proper setup invites trouble. First, choose a location: under an eave, in a weatherproof cabinet, or on a garage wall. The transformer must plug into a GFCI-protected outlet (required by code in most areas). Never use a standard outlet, a GFCI detects ground faults and cuts power in milliseconds, protecting you if something goes wrong.
Run your low voltage outdoor lighting cable in a trench 6 inches deep, deep enough to avoid damage from raking or aeration but not so deep that you run into underground utilities. Call 811 before you dig to mark buried lines. Use a landscape lighting controller timer or built-in photocell on the transformer so lights don’t run all day. Always bury connections in weatherproof junction boxes: exposed splices corrode and fail quickly.
Safety is non-negotiable: wear gloves and eye protection when handling wire and digging. If your yard has established utility lines, hire a locating service or contact your utility company. For transformer installation, unless you’re completely comfortable with outdoor electrical work, it’s worth having a licensed electrician verify the setup, the cost is modest compared to property damage or injury. Test the system before burying wires: plug in the transformer, verify lights illuminate, and walk the entire circuit to confirm proper brightness.
Common Issues and Troubleshooting
A few problems recur in landscape lighting systems. Dimming or flickering lights almost always point to voltage drop, your cable is too long, too thin, or overloaded. Move the transformer closer, use thicker gauge wire, or split the circuit. Lights not coming on usually means a tripped GFCI outlet (check and reset it) or a broken wire in the trench (dig carefully to locate the break). Inconsistent brightness across fixtures indicates uneven voltage, lights near the transformer are bright, far ones are dim. This is normal over very long runs but fixable by repositioning the transformer or shortening runs.
Corrosion at connections happens when moisture enters junction boxes or splices. Rebury connections deeper, seal them with weatherproof silicone, or replace corroded fixtures. If your outdoor lighting control features aren’t working (timer not switching on/off, dimmer unresponsive), check that the photocell isn’t covered with dirt and that any smart controller is synced to your home network. Most troubleshooting boils down to three steps: confirm the GFCI is reset and the outlet is live, verify the transformer is powered on and set correctly, then trace the cable and connection points for visible damage.
Regular maintenance extends the life of your system. Once a year, inspect buried wire for damage after digging season, clean photocells and timer dials of leaves and debris, and replace any burned-out bulbs. If you’re upgrading to LED fixtures mid-system life, verify the transformer is compatible, many older transformers aren’t optimized for low-current LED loads and may hum or buzz. A landscape lighting transformer designed for LEDs will run quieter and more efficiently.