

A well-lit front entrance does more than light the way home, it’s the first impression of the property and a core element of curb appeal. Strategic outdoor front lighting enhances security, showcases architectural details, and sets the mood for the whole neighborhood. Whether working with a modern facade or a classic colonial, the right lighting approach can elevate how a home looks after dark. This guide breaks down the practical decisions behind choosing, placing, and installing outdoor front lighting that works for both aesthetics and functionality.
Table of Contents
ToggleKey Takeaways
- Strategic outdoor front lighting enhances security, curb appeal, and home value by showcasing architectural details and creating a welcoming nighttime presence.
- Match your outdoor lighting ideas for front of house to your home’s architectural style—modern homes suit clean-lined fixtures in matte black, while traditional homes pair better with lantern-style sconces in oil-rubbed bronze.
- Flank the front door with wall sconces at 60–66 inches high and 3–4 feet from the frame on each side, place downlighting 8–10 feet above the entry, and guide pathways with dimmer lights spaced 4–6 feet apart for optimal balance and safety.
- LED fixtures consume 75–85% less energy than incandescent bulbs and last 25,000–50,000 hours, making them the most cost-effective choice for outdoor lighting over time.
- Low-voltage (12V) lighting systems offer DIY-friendly installation at a reasonable cost ($100–300 for kits), while hardwired circuits require licensed electrician installation and budget of $500–1,200 but provide maximum flexibility and reliability.
Why Outdoor Front Lighting Matters
Outdoor front lighting serves three critical functions: security, navigation, and design impact. A well-lit entryway deters unwanted activity because potential intruders avoid homes where they’re visible, and proper illumination helps residents and guests move safely from the driveway to the door. Beyond practicality, lighting transforms the home’s nighttime presence. It highlights textured siding, accentuates architectural features like columns or trim, and creates depth that’s invisible in daylight. Studies show that homes with intentional landscape and architectural lighting sell faster and command higher prices, it’s a relatively low-cost upgrade with measurable ROI.
How to Choose the Right Lighting Style for Your Home
The style of outdoor lighting should complement the home’s architecture, not fight it. Mismatched fixtures stand out like using a brass chandelier in a farmhouse kitchen. Start by identifying your home’s dominant style, then select fixtures that echo its visual language.
Modern and Contemporary
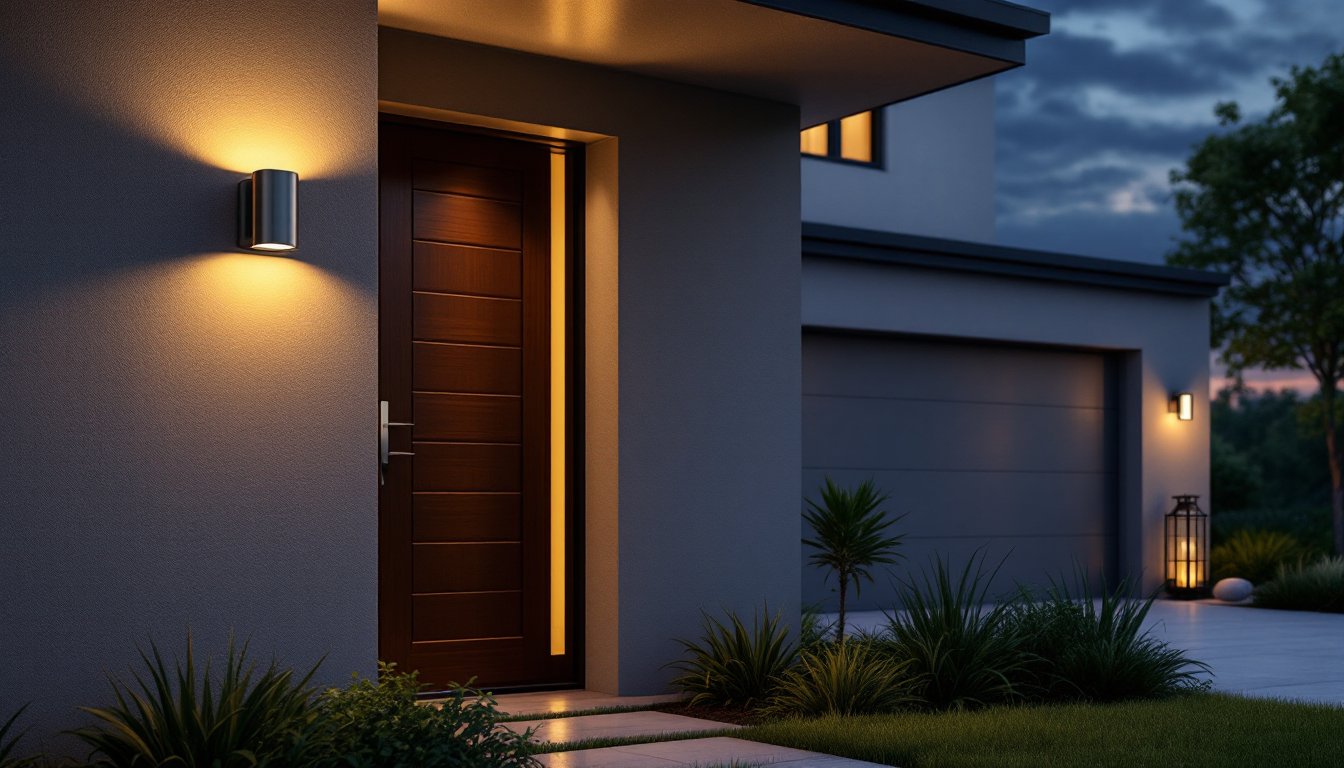
Modern homes pair well with clean-lined fixtures: recessed downlights, linear wall sconces, and minimalist path lights. Look for fixtures in matte black, brushed stainless steel, or powder-coated aluminum finishes. LED options with smart controls fit naturally here: homeowners appreciate the tech integration. Avoid ornate details, glass panes, and warm bronze tones, they’ll read as dated against flat facades and large windows. Geometric shapes and asymmetrical placement work better than symmetrical pairs.
Traditional and Classic
Traditional homes thrive with lantern-style wall sconces, coach lights, and post-mounted fixtures in oil-rubbed bronze or dark brown finishes. Opt for fixtures that include glass panes, metal scrollwork, or period-appropriate detailing. Think lantern shapes, arched tops, and visible bulbs (often LED Edison-style for the vintage aesthetic without heat or high wattage). Pairs of identical fixtures flanking the door feel right: symmetrical placement reinforces classic balance. These homes also suit warm color temperatures (2700K) and diffused light from within the fixture rather than direct downlighting.
Key Lighting Placement Strategies
Placement is where most DIYers stumble. Poor placement creates shadows on the face of visitors, glare into windows, or unlit dead zones around the entry. Follow these proven strategies:
Flank the front door with matching wall sconces mounted at roughly 60–66 inches from the ground to the center of each fixture. This creates balance and lights faces at a natural angle. Space them 3–4 feet from the door frame on each side for optimal symmetry.
Mount downlighting above the door or soffit at least 8–10 feet high to avoid glare and create ambient light across the entry threshold. A single recessed or surface-mounted fixture works: multiple fixtures should be spaced 4–6 feet apart for even coverage.
Illuminate the path from the driveway to the door using low-profile path lights, step lights, or recessed ground-level fixtures spaced 4–6 feet apart. These should be dimmer than entry lights, around 5–10 watts or 200–300 lumens, so they guide without overwhelming.
Accent architectural features, columns, stone accents, arched entryways, by placing uplights or spotlights at ground level angled upward. Aim for a 30–45-degree angle to highlight texture without harsh shadows. Space fixtures 2–4 feet from the feature being lit.
Avoid common mistakes: Don’t light the home’s face directly from below (makes it look institutional). Don’t space fixtures randomly or assume symmetry isn’t needed, the eye notices imbalance even subconsciously. Don’t forget about light spillage into neighbors’ windows or onto the street.
Energy-Efficient and Smart Lighting Options
LED technology has become the standard for outdoor lighting, and for good reason. LED fixtures use 75–85% less energy than incandescent or halogen bulbs, last 25,000–50,000 hours (versus 1,000–2,000 for incandescent), and produce minimal heat. A typical outdoor path light drawing 5 watts of power might produce 200–300 lumens, equivalent to a 25-watt incandescent.
When selecting LEDs, pay attention to color temperature (Kelvin rating). Warm white (2700K) feels inviting and pairs well with traditional homes. Neutral white (3000–4000K) suits modern designs and creates crisp visibility. Cool white (5000K+) can feel harsh around residences: save it for security applications. All outdoor LEDs should be rated for wet locations (typically marked IP65 or higher, meaning dust and water-resistant).
Smart outdoor lighting adds convenience and security. WiFi or Bluetooth-enabled fixtures let homeowners control brightness and on/off timing from a phone. Many integrate with voice assistants. Solar-powered smart lights exist but are less reliable in overcast climates: hardwired smart fixtures offer consistent performance. Budget roughly $30–80 per smart-enabled fixture depending on features.
For basic cost savings, start with LED fixtures on a standard timer or photocell (which turns lights on at dusk and off at dawn automatically). A photocell retrofit costs $15–30 and pays for itself in reduced energy bills within a season.
Budget-Friendly Installation Tips
Installation difficulty depends on whether the home already has outdoor electrical outlets. If hardwiring new fixtures, hire a licensed electrician unless the homeowner is experienced, outdoor wiring requires weatherproof conduit, proper breaker sizing, and GFCI protection per NEC code. Expect to budget $500–1,200 per new hardwired circuit including labor and materials.
Plug-in and solar options offer no-wire alternatives. Battery-powered or solar path lights (often $15–40 each) work well for lighting a walkway without digging trenches. Quality solar lights need 4–6 hours of direct sunlight daily: they struggle in heavily shaded yards. Solar performance also degrades in cold climates: many models aren’t rated below 32°F.
Low-voltage lighting systems (12V) are a sweet spot for DIYers. A transformer (stepped down from standard 120V household current) powers fixtures via buried or concealed wire. Kits run $100–300 and come with fixtures, wiring, and a transformer. Installation: Dig a shallow trench (4–6 inches deep), lay the wire, connect fixtures, and set the transformer near an outlet under a covered area. No digging post holes for each fixture, the wires feed multiple lights. Risks are minimal because 12V won’t shock.
Budget material costs (not labor): path lights $10–30 each, basic hardwired sconces $20–60 each, recessed downlights $40–100 each, smart fixtures add $15–50 per unit. Transformers run $80–200 depending on wattage capacity. Don’t cheap out on weatherproofing, a $15 fixture that corrodes after one winter costs more in aggravation than a $50 fixture rated for 10 years.