
For homeowners looking to enhance curb appeal and extend outdoor living space into the evening, 12V outdoor lighting offers a practical, safe, and energy-efficient solution. Low-voltage systems operate at 12 volts, a fraction of standard household current, making them ideal for DIY installation without the need for a licensed electrician in most jurisdictions. Unlike traditional line-voltage lighting, which requires trenching for conduit and strict code compliance, 12V systems use simple wiring buried shallowly or run above ground, can be reconfigured seasonally, and consume far less power than halogen or incandescent alternatives. Whether lighting a pathway, accentuating landscape features, or brightening a deck, understanding the fundamentals of low-voltage systems helps homeowners choose the right approach, avoid common mistakes, and achieve professional results.
Table of Contents
ToggleKey Takeaways
- 12V outdoor lighting is a DIY-friendly, energy-efficient alternative to line-voltage systems that requires no permits in most jurisdictions and eliminates shock risk compared to standard household current.
- LED 12V fixtures consume 80–90% less power than incandescent options and last 25,000–50,000 hours, breaking even in 2–3 seasons despite higher upfront costs.
- Proper system planning requires calculating total fixture wattage, choosing appropriate transformer size (leaving 20% headroom), and verifying cable gauge based on run length to prevent voltage drop.
- Path lights, landscape spotlights, deck lights, and uplighting fixtures address different applications, with LED versions typically drawing 4–8W each for efficient coverage.
- Installation involves shallow burial (4–6 inches deep) or above-ground cable routing, simple fixture mounting to stakes or surfaces, and annual maintenance like lens cleaning and connection inspection.
- Always call 811 before digging, confirm local codes apply, and use weatherproof connectors with silicone tape to protect connections in outdoor conditions.
What Is 12V Outdoor Lighting and Why It Matters
A 12V outdoor lighting system consists of a transformer (which steps down standard 120V household current to 12V), low-voltage cable, and light fixtures designed to operate safely at that reduced voltage. The transformer is typically installed indoors or in a weatherproof enclosure near an exterior outlet: the transformer outputs run underground or along surfaces to fixture locations.
Why 12V instead of standard household voltage? Safety is paramount. Contact with 12V wiring poses minimal shock risk compared to 120V, which is why installers can bury cable shallowly, usually 4–6 inches deep, without armored conduit. This makes retrofitting landscapes far easier: no jackhammering trenches for rigid conduit or pulling expensive permits in many areas. Also, 12V systems are energy-efficient (especially LED versions), produce less heat, and allow quick fixture repositioning without rewiring.
Most municipalities don’t require permits for basic 12V landscape lighting because it falls outside the National Electrical Code’s strict line-voltage requirements. That said, always check local codes: a few jurisdictions have specific rules. The key takeaway: 12V lighting is a DIY-friendly, forgiving entry point into outdoor illumination.
Key Benefits of Low-Voltage Lighting Systems
Energy efficiency ranks first among homeowners’ reasons to go low-voltage. LED 12V fixtures consume 80–90% less power than incandescent alternatives and last 25,000–50,000 hours, drastically reducing replacement cycles and electricity bills.
Ease of installation appeals to DIYers. A basic 12V system requires only an outdoor outlet, a transformer, and UL-rated cable: no trenching armor, no electrical contractor markup, and minimal code paperwork in most regions. Fixtures screw into ground stakes or mount directly to rails and posts.
Design flexibility sets low-voltage apart. Transformers come in various wattage ratings (60W, 100W, 300W, 600W), so homeowners can add fixtures over time without replacing the power source. Cable can snake around obstacles, hide behind planting, or stake-mount above ground for seasonal use.
Durability and safety matter for outdoor installs. Low-voltage fixtures are built for weather: stainless steel, powder-coated aluminum, and sealed electronics resist corrosion. The 12V standard eliminates shock risk that line-voltage systems pose, making low-voltage safer around pools, wet areas, and family spaces.
Cost-effectiveness extends beyond electricity savings. System components, transformers, cable, fixtures, are affordable and widely available at hardware stores and online retailers. A basic pathway lighting setup often costs $100–300 to install, compared to $500+ for line-voltage alternatives.
Types of 12V Outdoor Lights for Every Application
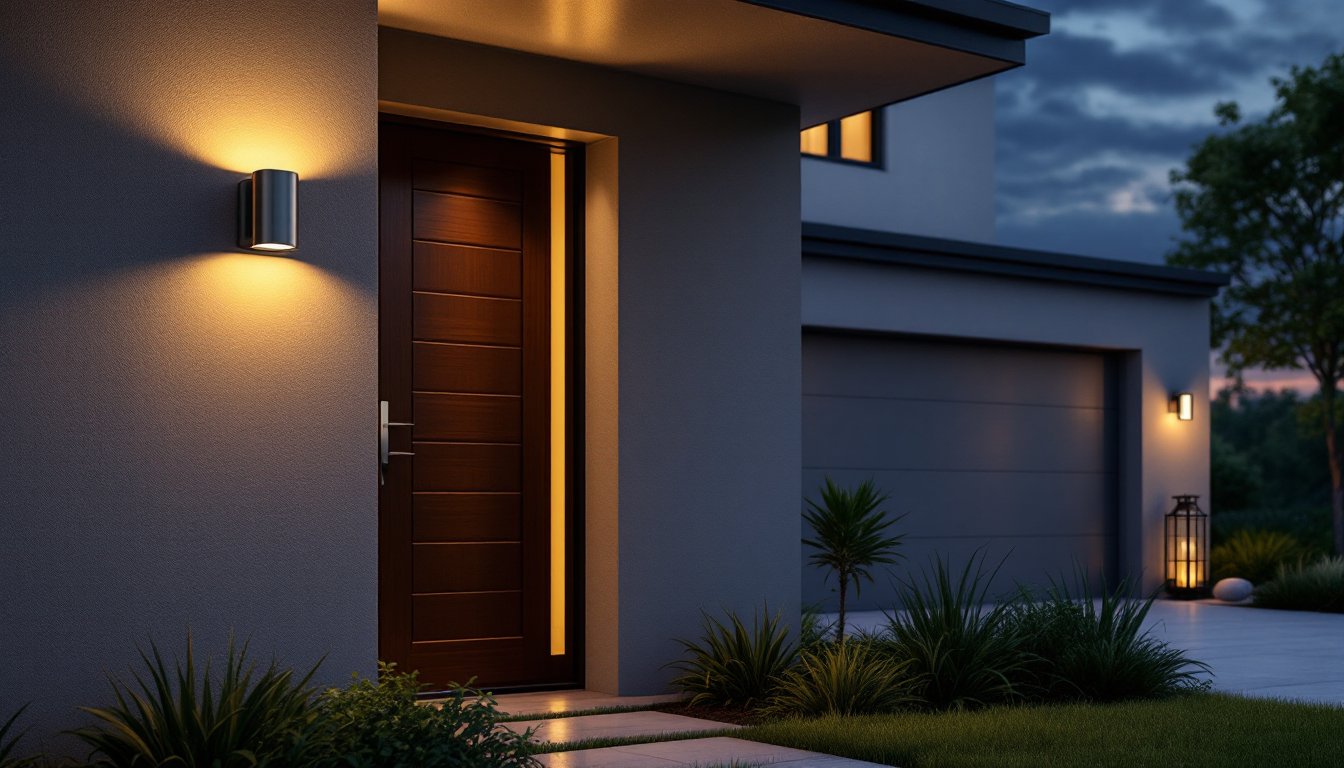
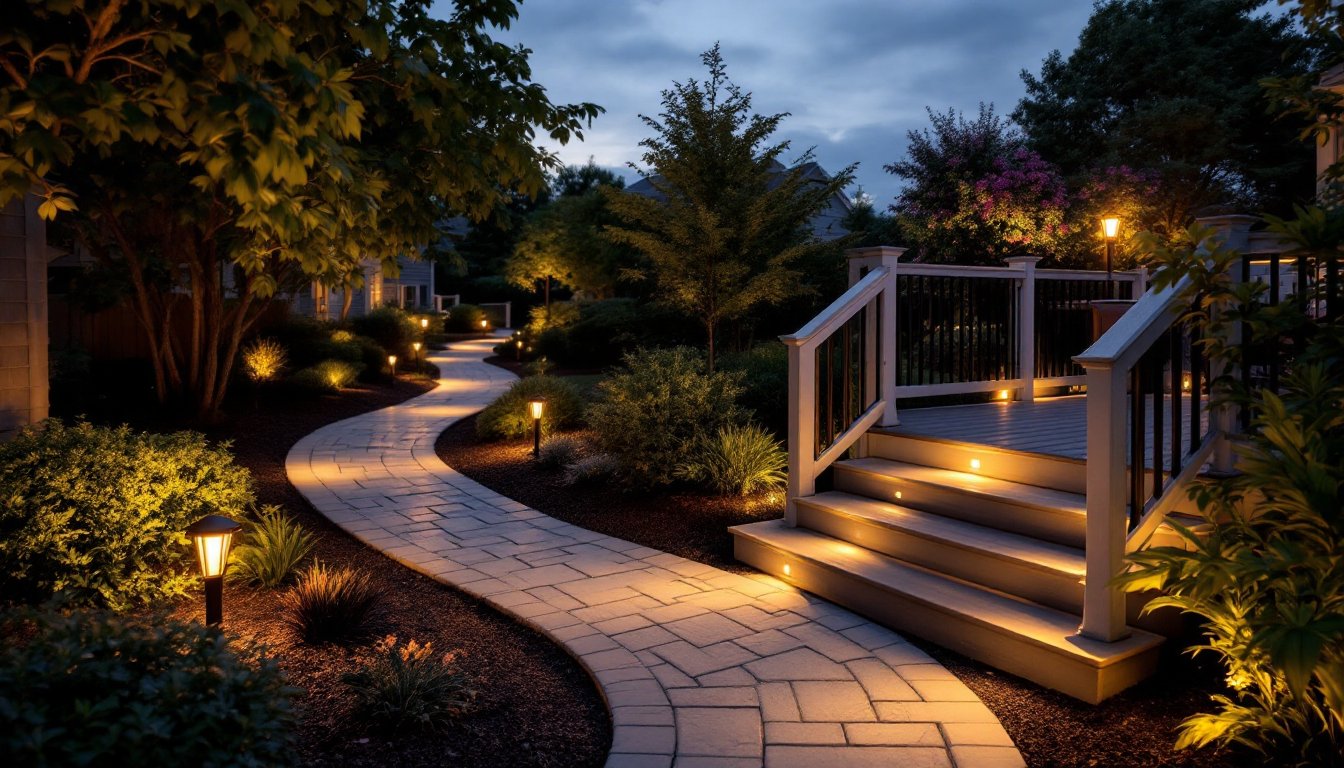
Path and Landscape Lights
Path lights are squat fixtures (typically 10–18 inches tall) with a hood or diffuser that direct light downward onto walkways, garden beds, or lawn areas. They stake directly into soil, require no mounting hardware, and are the most common 12V fixture type.
Landscape spotlights are directional fixtures that accent trees, architectural features, or specimen plants. Available as well lights (recessed into the ground) or stake-mounted versions, spotlights let homeowners angle light to highlight foliage color, texture, or form. A spread lens (roughly 20–40° beam angle) works for general accent: a narrow lens (10–20°) isolates small features.
Uplighting (fixtures placed low, aiming upward) creates dramatic shadows on tree canopies or building facades. Downlighting (mounted high, aiming down) mimics moonlight through canopy and eliminates dark shadows across a deck.
Path and landscape lights typically draw 4–8W each (LED) or 10–20W (halogen). A 100W transformer can run roughly 12–15 LED path lights or 6–8 halogen units. Calculate total wattage before purchasing: undersizing the transformer dims all fixtures.
Deck and Step Lights
Deck lights mount into step risers, fascia, or post sides to outline stairs and decks while providing safe passage at night. Recessed step lights fit into a 3–4 inch hole routed or drilled into risers: surface-mount deck lights screw flush to vertical surfaces.
Most deck lights are compact (2–3 inches square) and consume 0.5–2W (LED). Some use a separate 12V source: others tap into the same transformer as landscape lighting, though running a dedicated low-amp transformer (often 60W) for deck circuits prevents dimming if the landscape system is overloaded.
Step lights with frosted or clear lenses prevent glare on faces: amber or warm color temps (2700–3000K) feel more welcoming and don’t disrupt evening mood as much as cool white. Check mounting depth, many decks have shallow fascia, so verify that the fixture housing (the back plate and connections) fits without protruding awkwardly.
Choosing the Right 12V Lighting System
Step 1: Assess your landscape and desired effect. Walk the property at dusk and note areas that need light: pathways, accent features, entry points, steps. Sketch a rough map and mark fixture locations. This prevents overbuying and ensures coverage where you need it.
Step 2: Calculate total wattage. List every fixture you plan to install and sum their wattage. If you’re using a 100W transformer, you can safely run up to 80W of fixtures (leaving 20% headroom to prevent dimming and component strain). Common setup: 12 LED path lights (6W each = 72W) fit comfortably: add a 100W transformer.
Step 3: Choose LED or halogen. LED fixtures cost more upfront (roughly 30–50% premium) but last 40,000+ hours and use 80% less power. Halogen is cheaper initially ($5–15 per fixture) but runs hot, dims over time, and needs replacement every 2,000–5,000 hours. For most homeowners, LED breaks even in 2–3 seasons and wins long-term.
Step 4: Pick your cable and run location. Low-voltage cable comes in 12/2 (two conductors, 12-gauge, common) and thicker gauges for longer runs. Cable longer than 100 feet may need thicker gauge to reduce voltage drop. Most people bury cable 4–6 inches deep or stake it above ground along edging: staking is quicker but visible.
Step 5: Select transformer features. Basic transformers switch on/off via a timer or photosensor. Photocell models turn lights on at dusk automatically: timer models let you set on/off windows. Some new transformers include smart features (app control, dimming), but they cost more. For DIY simplicity, a photocell-timer combo works fine.
Step 6: Verify local codes and utility lines. Call 811 before digging or trenching. Check whether permits are required in your area (most don’t need one for 12V, but confirm). Always know where gas, water, and electric lines run.
Installation and Maintenance Tips
Before you start: Gather materials (transformer, cable, fixtures, stakes, connector clips, weatherproof tape). Acclimate LED fixtures to outdoor temperature for 24 hours if they’re new, this stabilizes components.
Installation steps:
- Dry-fit the transformer indoors near your outlet. Test it before installation to confirm it powers on and the voltage reads 12V at the output terminals (use a multimeter).
- Route cable from transformer to fixture locations. Use weatherproof connector clips or adhesive-backed clips to route along fascia, under edging, or along steps. Avoid sharp bends.
- Bury cable 4–6 inches deep in pathways (mark the run with paint or flags first). At corners or obstacles, bring cable above ground: bury the run again 2–3 feet away to avoid repeated stress points.
- Connect fixtures to cable using provided connectors (usually piercing or twist connectors rated for outdoor use). Wrap connections with silicone tape or use waterproof junction boxes for extra protection in wet climates.
- Mount fixtures: stake path lights into soil, screw deck lights into fastened bases, mount spotlights on ground stakes angled at your target.
- Power up and check voltage at the furthest fixture. If readings drop significantly (below 11V), voltage drop is occurring: upgrade cable gauge or split the load across two transformers.
Maintenance:
- Clean lenses and reflectors annually with a damp cloth to remove dust and debris.
- Check cable connections yearly for corrosion: reseal with silicone tape if needed.
- Inspect ground-buried cable every 2–3 years: ice heave or foot traffic can expose it, bury deeper if found.
- Replace LED fixtures that fail (rare, but plan for 1–2% annual failure rate). Halogen bulbs dim: budget for replacements every 3 years if using halogen.
- Test transformer photosensor seasonally: it may drift over time and turn lights on/off at odd times.
- Trim vegetation that grows over or shadows path lights: overgrowth blocks coverage.
Safety reminders: Wear gloves when handling weatherproof connectors (sharp edges). Use a voltmeter to confirm cable is de-energized before cutting or burying. Never run cable through high-traffic areas unburied: it’s a tripping hazard and vulnerable to damage.